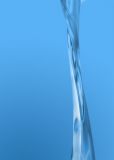
 This tutorial will show you how to create realistic looking water which you can then apply to a tap, hose, or even with some tweaking, a waterfall.
We will learn how to use blend modes, the warp tool and how to create realistic textures using clouds and plastic wrapping.
STEP 1
You will need to create a new doc (ctrl+n or apple+n on mac) and size it to 400px x 400px. Make sure your fore, and background colors are set to black and white by pressing D on the keypad.
Next apply some clouds: Filter > Render > Clouds

STEP 2
Next we blur the clouds into the direction we want the water to flow.
First: Filter > Blur > Gaussian Blur | Size 7
Second: Filter >Blur > Motion Blur | Angle 90, Distance 85

STEP 3
Now we need to squeeze the image.
Go to Image > Image Size
Set width to 250px make sure you have Constrain Proportions un-ticked.

STEP 4
In this step we apply a water-like texture.
Apply the following filters:
First: Filter > Artistic > Plastic Wrap | 15, 10, 10
Second: Filter > Sketch > Chrome | Detail 0, Smooth 10
Third: Fade the Chrome Edit > Fade Chrome | Opacity 90%, Mode: Hard Light

STEP 5
Now we stretch the images height.
Go to Image > Image Size
Set height to 700px make sure you have Constrain Proportions un-ticked.

STEP 6
Next we warp the image to look like water. Just play around until you are happy by moving the anchor points up, down in and out.
To do this, go to Edit > Transform > Warp.

STEP 7
To color the image simply add a gradient into the background and set the water layer to Hard Light in blend mode panel (above the layers list).


